Little Kernel 04
LK build system
The LK build system thinks of the world in four layers.
Projects
Projects are what you ask make to build.
They are a set of modules (typically apps and libraries) built for a Target.
They are defined in project/name.mk.
The Target is selected via TARGET := namein this makefile or an included makefile (in the case where multiple projects share a common configuration). You choose your project by either passing it to make on the commandline (make name) or putting a PROJECT := name directive in local.mk.
Targets
Targets are typically a specific PCB (or family of extremely closely related PCBs, maybe differing just a little, detectable by some revision resistors or the like).
They belong to a Platform and are defined in target/name/rules.mk.
The Platform is selected via PLATFORM := name in this makefile.
Platforms
Platforms typically are Systems-on-Chip (either individual or related families).
They belong to an Architecture and are defined in platform/name/rules.mk.
The Architecture is selected via ARCH := name in this makefile.
Architectures
Architectures are a specific CPU or CPU family (ARM Cortex M3, Intel IA32, etc).
Example Project
An example project is stm32f4-discovery-test.
The Target there is stm32f4-discovery (the ST development board of the same name).
Its Platform is stm32f4xx, a family of ST microcontrollers. STM32_CHIP is set to stm32f407 for things that may be specific to that chip. Some GLOBAL_DEFINES are configured here as well, like HSE_VALUE which is the frequency of the crystal — a platform-specific definition.
The Platform stm32f4xx sets ARCH as arm and ARM_CPU (specific to arm architecture) to cortex-m4, as well as configuring other platform-specific values.
The above configuration information lives in the following files in the lk source tree:
- project/stm32f4-discovery-test.mk
- target/stm32f4-discovery/rules.mk
- platform/stm32f4xx/rules.mk
- arch/arm/rules.mk
Building Outside The LK Tree
The build system provides a mechanism to overlay additional projects, targets, platforms, apps, libs, etc, from sibling directory hierarchies. This allows you to more easily build and maintain projects that are not part of the main lk tree.
For example, say you have LK checked out in an lk directory, and next to that you have a mystuff directory (a checkout of your own source tree). It can contain your own projects, libraries, and apps, like so:
- mystuff/project/toaster-oven.mk
- mystuff/target/toaster-oven/{rules.mk, init.c, …}
- mystuff/app/toaster-ui/{rules.mk, main.c, …}
- mystuff/lib/cool-lcd/{rules.mk, lcddriver.c, …}
- mystuff/lib/pid-controller/…
If you copy lk/makefile to mystuff/makefile and create lk_inc.mk like so:
1 | LOCAL_DIR := mystuff |
You can then cd to mystuff and run make to build your project. You don’t need to modify anything in the main lk tree, so it’s easy to keep that up to date — no need to fork it, merge or rebase your changes, etc.
Details
- LKMAKEROOT is the relative path from the overlay tree you’re building in to the directory that’s above the lk directory and any overlay tree directories (you can have multiple of these if you like). This variable is the only one that can have .. path elements in it. Such elements used anywhere else will cause the build system to misbehave.
- LKROOT is the path relative to LKMAKEROOT to LK itself.
- LKINC is the set of paths relative to LKMAKEROOT to overlay directories.
- DEFAULT_PROJECT does what it says — sets the project to build if another is not specified when make is invoked.
- BUILDROOT is relative to LKMAKEROOT and is the directory where build-$(PROJECT) will live, containing the build results.
- You can also specify your TOOLCHAIN_PREFIX here to point at your chosen cross-compiler for this overlay.
Alternate Approach
If you’d rather run make from the top directory (that contains lk and mystuff), you can copy lk/makefile and set up lk_inc.mk there instead. Just change the value of LKMAKEROOT and BUILDROOT both to . and you’re all set.
使用步骤
build essential
1 | 1.sudo apt-get install build-essential |
for arch arm64 build
1 | 1. mkdir -p gcc_linario_aarch64_toolchain |
for arch arm build
1 | 1. mkdir -p arm-eabi-5.3.0-Linux-x86_64 |
install qemu
1.sudo apt-get install qemu
2.安装QEMU之后,命令行输入”qemu- + Tab”可以找到有如下的命令可用:
1 | qemu-aarch64 qemu-make-debian-root qemu-nios2 qemu-sparc32plus qemu-system-microblazeel qemu-system-ppc64le qemu-system-xtensa |
可以看到它可以模拟很多种不同的架构。还有像qemu-img其实是一个工具,可以用来生成虚拟盘。
这里我们主要使用qemu-system-aarch64和qemu-system-arm。
3.可以查看qemu版本信息:
1 | $ qemu-system-arm -version |
主要参数说明:
1 | 1.支持的machine |
示例:
1 | qemu-system-arm -M vexpress-a9 -m 512M -nographic -append "console=ttyAMA0" -kernel /root/zImage-3.0 |
get lk code and build
1 | sudo apt-get install git |
我们看一下mk文件里定义了哪些内容:
lk/project/qemu-virt-a53-test.mk
1 | # main project for qemu-aarch64 |
lk/project/target/qemu-virt-a53.mk
1 | # main project for qemu-aarch64 |
lk/project/target/qemu-virt.mk
1 | # main project for qemu-virt |
lk/project/virtual/fs.mk
1 | # modules related to a file system layer |
lk/project/virtual/test.mk
1 | # common libraries for -test variants |
lk/project/virtual/minip.mk
1 | # modules related to the minip stack |
qemu run
1 | qemu-system-aarch64 -machine virt -cpu cortex-a53 -smp 1 -m 512M -kernel build-qemu-virt-a53-test/lk.elf |
可以看到有一个窗口弹出,默认为qemu console,Ctrl + Alt + 2切换到运行的系统的console,Ctrl + Alt + 1再切换回来。
在系统的console可以看到打印出来的启动过程: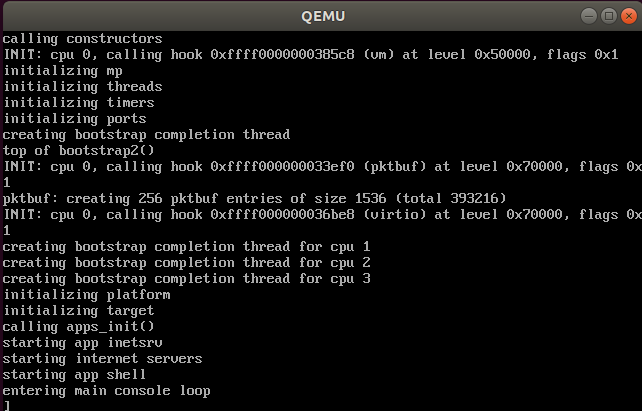
help 命令可以查看支持的测试指令。
命令添加参数-nographic -append “root=/dev/ram init=/init console=ttyS0”,可以重定向qemu的打印消息到当前console,这样就可以靠鼠标滚轮查看内核启动消息。
1 | qemu-system-aarch64 -machine virt -cpu cortex-a53 -smp 1 -m 512M -nographic -append "root=/dev/ram init=/init console=ttyS0" -kernel build-qemu-virt-a53-test/lk.elf |

本文标题:Little Kernel 04
文章作者:Mr Bluyee
发布时间:2018-11-14
最后更新:2019-07-15
原始链接:https://www.mrbluyee.com/2018/11/14/Little-Kernel-04/
版权声明:The author owns the copyright, please indicate the source reproduced.